
Playbook Testing
Overview
Playbook Testing (AKA Forge) is CLI-based tool that helps you understand if your Playbooks will have the intended effect on data when it is sent to a downstream vendor. You can understand how the current version of the playbook will manipulate an event, which will help you identify potential issues without having to wait for data to show in a vendor dashboard.
Key Benefits
- Speed up your Playbook building workflow.
- Debug integrations and test changes before deploying them
- Limit Playbook revision counts by testing them before you deploy. Without Forge, your only way to gather feedback is to wait for data to appear in vendor dashboards, which may be delayed by hours at a time.
Prerequisites
- Install the MetaRouter CLI toolset if you have not already done so. This will give you access to the Forge tool.
- An integrated development environment like VSCode can help you edit and manage your Playbook files.
Preparing Forge
Download & edit the Boilerplate file
First, download the Forge Boilerplate ZIP file. We are working to make the Boilerplate ZIP file publicly available. In the meantime, please reach out to your MetaRouter Customer Success Manager for the ZIP file.
The Boilerplate folder contains three sub-folders:
- The
fixturesfile contains the event files you would like Forge test playbooks with. It comes preloaded with a sample event, but you can use the Debugger tool to download an event that has been sent through one of your pipelines. We recommend testing with events that are sent through your own pipeline. - The
pipelinefolder contains a complete set of Playbook files. You may add folders for multiple integrations that you would like to test. There are two required files and one optional file in a set of Playbook files:- [Required] The
connection.yamlfile contains any connection details required for the integration. - [Required] The
playbook.yamlfile contains your Global, Event-specific, Default, and Filter Playbook configurations for a specific integration. - [Optional] The
params.yamlfile contains Pipeline Variable configurations if you have designated any parameters as such within your playbook.
- [Required] The
- The
tmpfolder contains two files:- The forge.yaml file allows you to specify which event file (
InputFile) and integration (KitDir) that you would like to test with Forge. - The
forge.logfile stores vendor API responses from tests you have run with Forge.
- The forge.yaml file allows you to specify which event file (
Changing Your Test Event
You can change the test event Forge uses through two ways:
- Delete the existing code in the test.json file and replace it with your own event’s code.
- Create a new file within the
fixturesfolder that contains your test event code. You can add and easily test multiple test events by doing so, but you will need to change yourforge.yamlfile to switch between events. On Line 2, change theInputFilekey’s value from./fixtures/test.jsonto./fixtures/[new_event_name].json. The[new_event_name]is whatever you have named your event file.
Changing Your Test Integration
You can change the Integration (or “kit”) that you want to test with Forge by downloading the playbook from the UI. Then, drop it into the pipeline folder. Finally, modify the forge.yaml file in the Forge directory.
While you test your integration, you can change the connection.yaml, playbook.yaml, and params.yaml files to see how changes affect the integration. Once finished, you can upload your updated files back into the UI.
Run Forge
Once your Boilerplate file contains the events and integrations you’d like to use during testing, you’re ready to begin running Forge!
- From your terminal,
cdinto the Forge directory so you can access the application. - Run
forgefrom within the Forge directory.
Your terminal should now show the Forge interface.
Using Forge
The Forge interface provides three sections of information.
- Settings and Commands. This section provides general information about the integration and event you have loaded into Forge, as well as useful commands when using Forge.
- Navigation. This section displays the tabs that you may navigate between - Input, Output, Request, Response, and Integration.
- Data Display. This section displays data according to the navigation tab you have selected. This will default to the Input tab when Forge is first loaded.
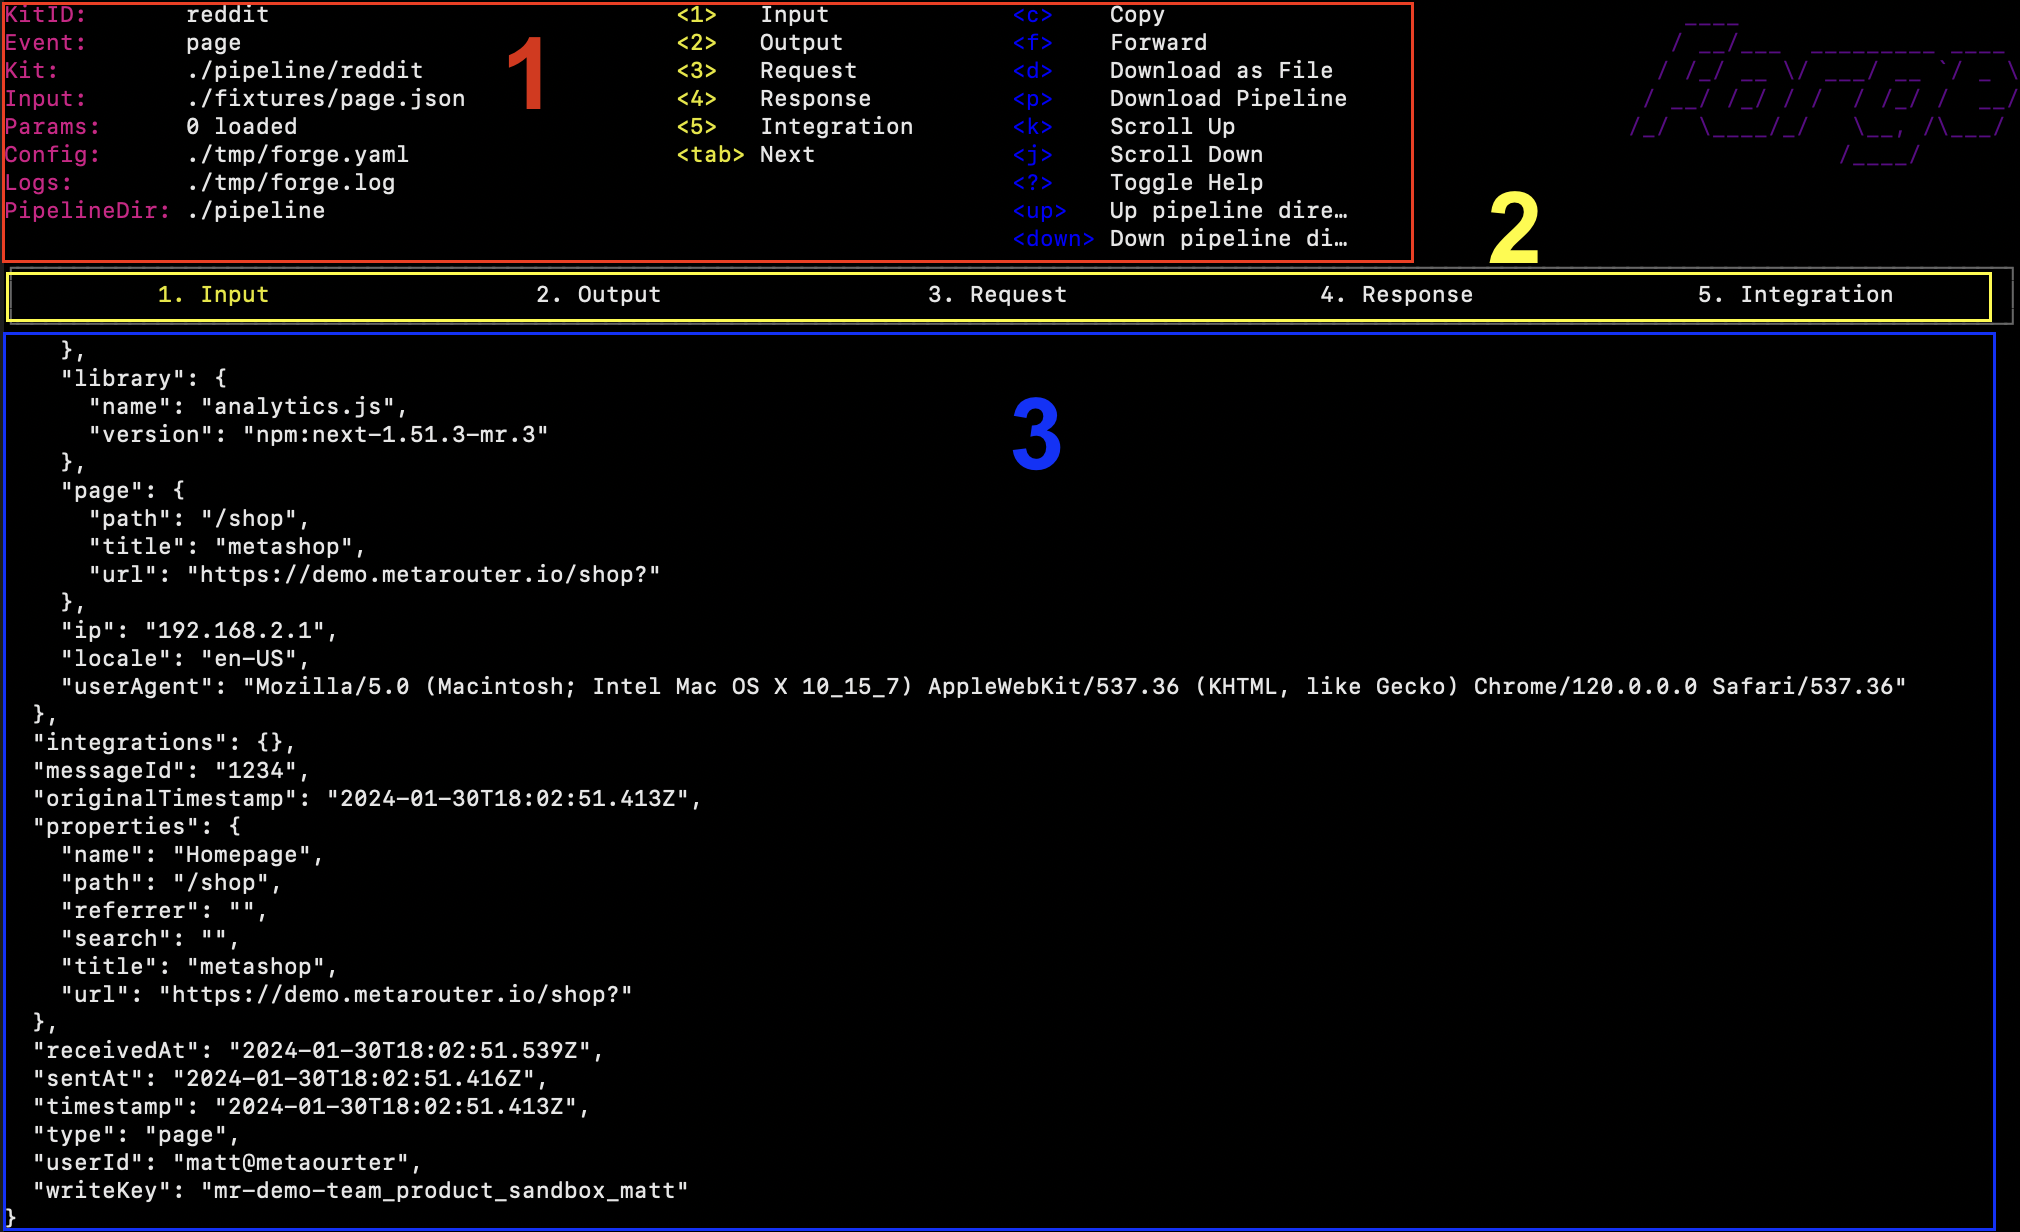
Settings and Commands
The left-hand column provides information about the settings and details of the files that the forge.yaml is referencing. It will also let you know if any required files are missing.
The middle column provides the following navigation commands that you can enter.
1will open the Input tab.2will open the Output tab.3will open the Request tab.4will open the Response tab.5will open the Integration tab.
The right-hand column shows keyboard shortcuts that allow you to interact with the data being displayed.
cwill copy the data shown.fwill forward the event to the vendor for testing. This is required to see data in the Request and Response tabs.dwill download the data displayed as markdown to your device.kallows you to scroll up.jallows you to scroll down.pwill download a cluster-deployable pipeline for all integrations within thepipelinedirectory. Deploying a pipeline via the CLI can only be performed by a MetaRouter Super Admin.upanddownwill let you navigate between integrations, helping you to troubleshoot multiple integrations quickly.
Navigation Tabs
There are five tabs you can navigate between in Forge:
- Input displays the input event data that the
forge.yamlfile is point to. - Output displays the affect of the connection details, playbook details, and pipeline variable details on the event input data.
- Request displays the actual API request that MetaRouter would make to a vendor.
- Response displays the API response that the vendor has provided to MetaRouter. You must forward (
f) an event to the vendor via Forge to receive a Response. - Integration displays the rendered pipeline yaml that the system uses within the backend to determine how to filter, transform, and send data to the vendor API.
Data Display
The Data Display will update anytime you:
- Change the tab being viewed.
- Save an updated event or connection, playbook, or params file.
Changes happen in near-realtime and replicate live platform behavior so you can quickly troubleshoot and adjust files.
Updated 10 months ago