
Google Ads - Conversions
What is Google Ads - Conversions?
Google Ads is an online advertising platform that enables businesses to display ads on Google's search engine results pages and its network of partner websites and platforms. Advertisers can target their ads based on keywords, demographics, interests, and behaviors. It provides a powerful means for businesses to reach their target audience, drive traffic to their websites, and promote their products or services effectively.
The Google Ads - Conversions integration uses Google Ads' Upload Click Conversions API to track click-based conversions.
What are the benefits of integrating MetaRouter with Google Ads?
- Streamline, standardize, and control customer data before reaching Google Ads.
- Decrease the presence of Google tags on your website to enhance SEO performance and overall website experience.
- Improve SEO performance and website experience while reducing the footprint of Google tags on your website.
Google Ads - Notes and Limitations
- This integration is used for tracking click-through conversions only. It does not include the Google Ads Customer Match feature or track view-through conversions.
- This integration uses offline conversions only. New offline conversions must be created in Google Ads and linked to your events in MetaRouter. More information on this process is included below.
- If you would like to track first-party users in Google Ads audience segments, please use the add-on integration Google AJSID Segments in addition to the Google Ads - Conversions integration.
Getting Started - From Your Google Ads Account
Ensure Auto Tagging is Enabled
Auto-tagging will attach the “Google Click Identifier” (gclid) parameter to the URL your customers click. The gclid is needed for user identification within the integration. Auto-tagging is turned on by default for new accounts. You can check whether auto-tagging is on by going to your account settings:
- In your Google Ads account, click Admin on the left page menu.
- Select Account settings from the options available.
- Under the “Account settings” menu, select the Auto-tagging drop-down.
- Confirm if the box next to “Tag the URL that people click through from my ad” is checked. If the box is checked, auto-tagging is on.
Find Your Customer ID
- Your customer ID is a unique number used to identify your Google Ads account.

Set Up Authentication
-
Developer Token
- Create a Developer Token
- In your Google Ads account, select Admin.
- Under Setup, select API Center, which will create the required developer token.
- After the test API has been created, click the access level.
- Apply for Basic Access.
- This step can take up to three days.
- Save the token to use within the connection parameters as the
DEVELOPER_TOKEN.
- Create a Developer Token
-
Create OAuth Flow
-
Create service account
-
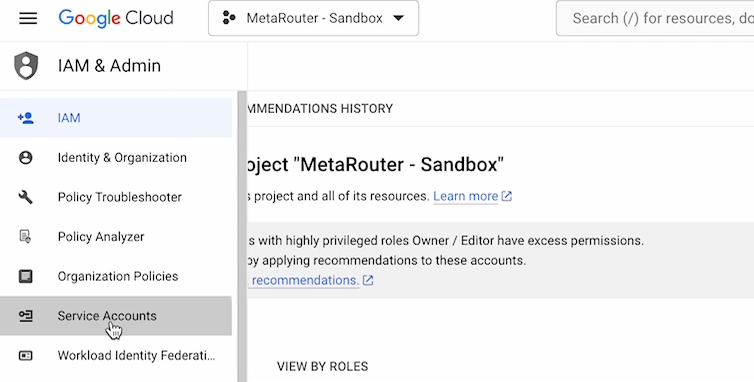
Go to Google Cloud console.
-
Click on Service Accounts.
-
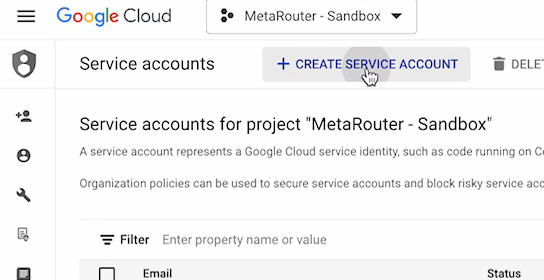
Click Create Service Account.
-
Fill out service account details.
-
Press the Create and continue button.
-
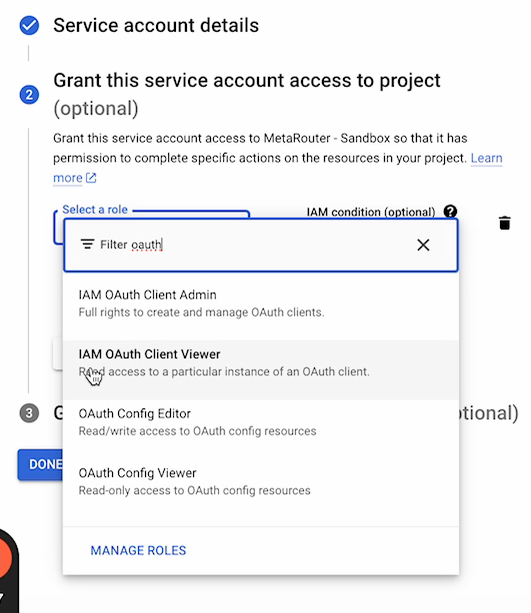
Select role for service account. We recommend minimal access with a role such as “IAM OAuth Client Viewer”. You may skip user access portion.
-
Hit done to create service account.
-
Under the “Email” column, you will use the email listed within the connection parameters as the
SERVICE_ACCOUNT_EMAIL.
-
-
Create a Private Key
-
Continuing within the Google Cloud console, Service Accounts window, look for the service account you created and click on the 3-dot menu under the “Actions” column.
-
Click Manage Keys.
-
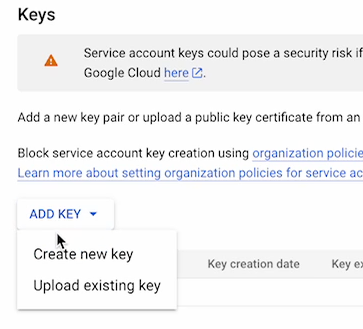
Click Add Key.
-
Click Create New Key.
-
Select “JSON” as the key type and click Create. A file will save to your device.
-
Use the save key in the connection parameters as the
PRIVATE_KEY.
-
-
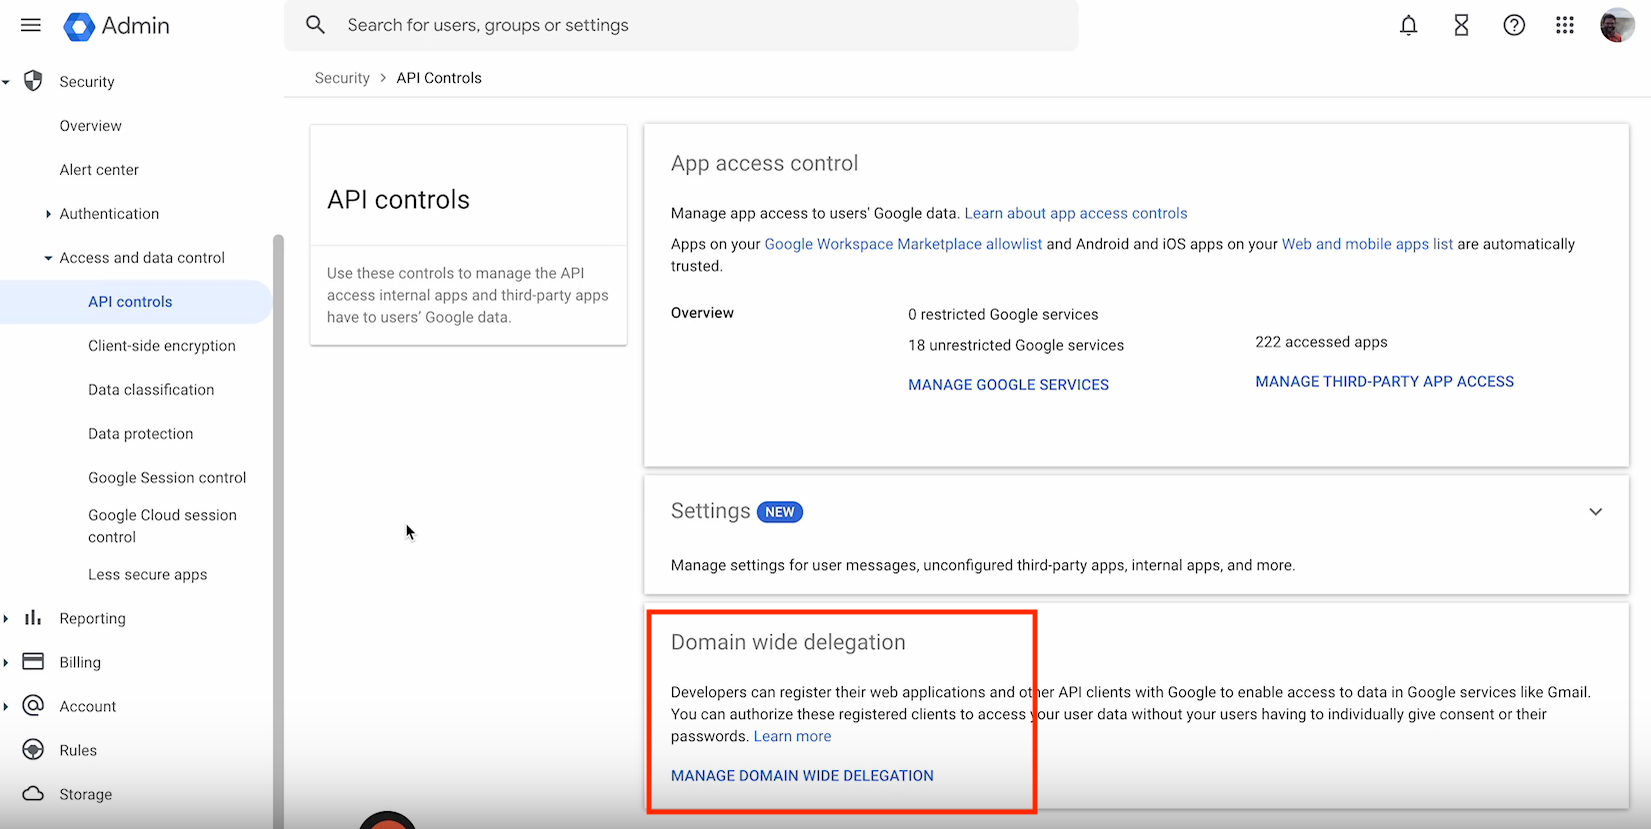
Perform Google Workspace domain-wide delegations of authority
-
Go to Admin Console.
-
Go to Security > API Controls > Domain-wide Delegation > Manage Domain Wide Delegation.
-
Click Add new.
-
In the Client ID field, enter the client ID obtained from the service account creation steps above.
- Click on your service account email in Google Cloud console
- Click on Advanced settings and you will find your Client ID
-
In the ”OAuth Scopes” field, enter a comma-delimited list of the scopes required for your application.
-
Add the following for Google Ads:
https://www.googleapis.com/auth/adwords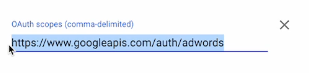
-
-
Click Authorize.
-
-
Create Offline Conversion Events
You will need to use offline conversion events and gather their IDs to assign to your event. Please consult the guide below for creating offline conversion events and acquiring event IDs.
-
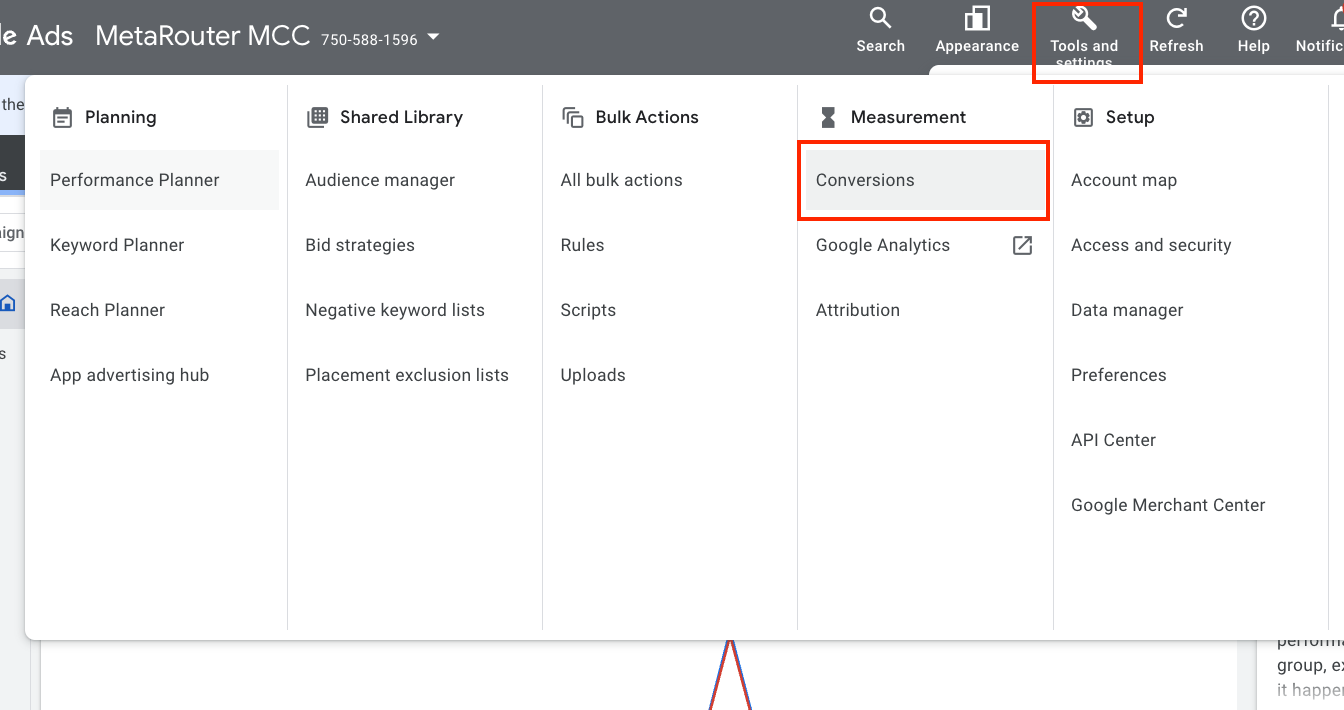
Under Tools & Settings, click on Conversions.
-
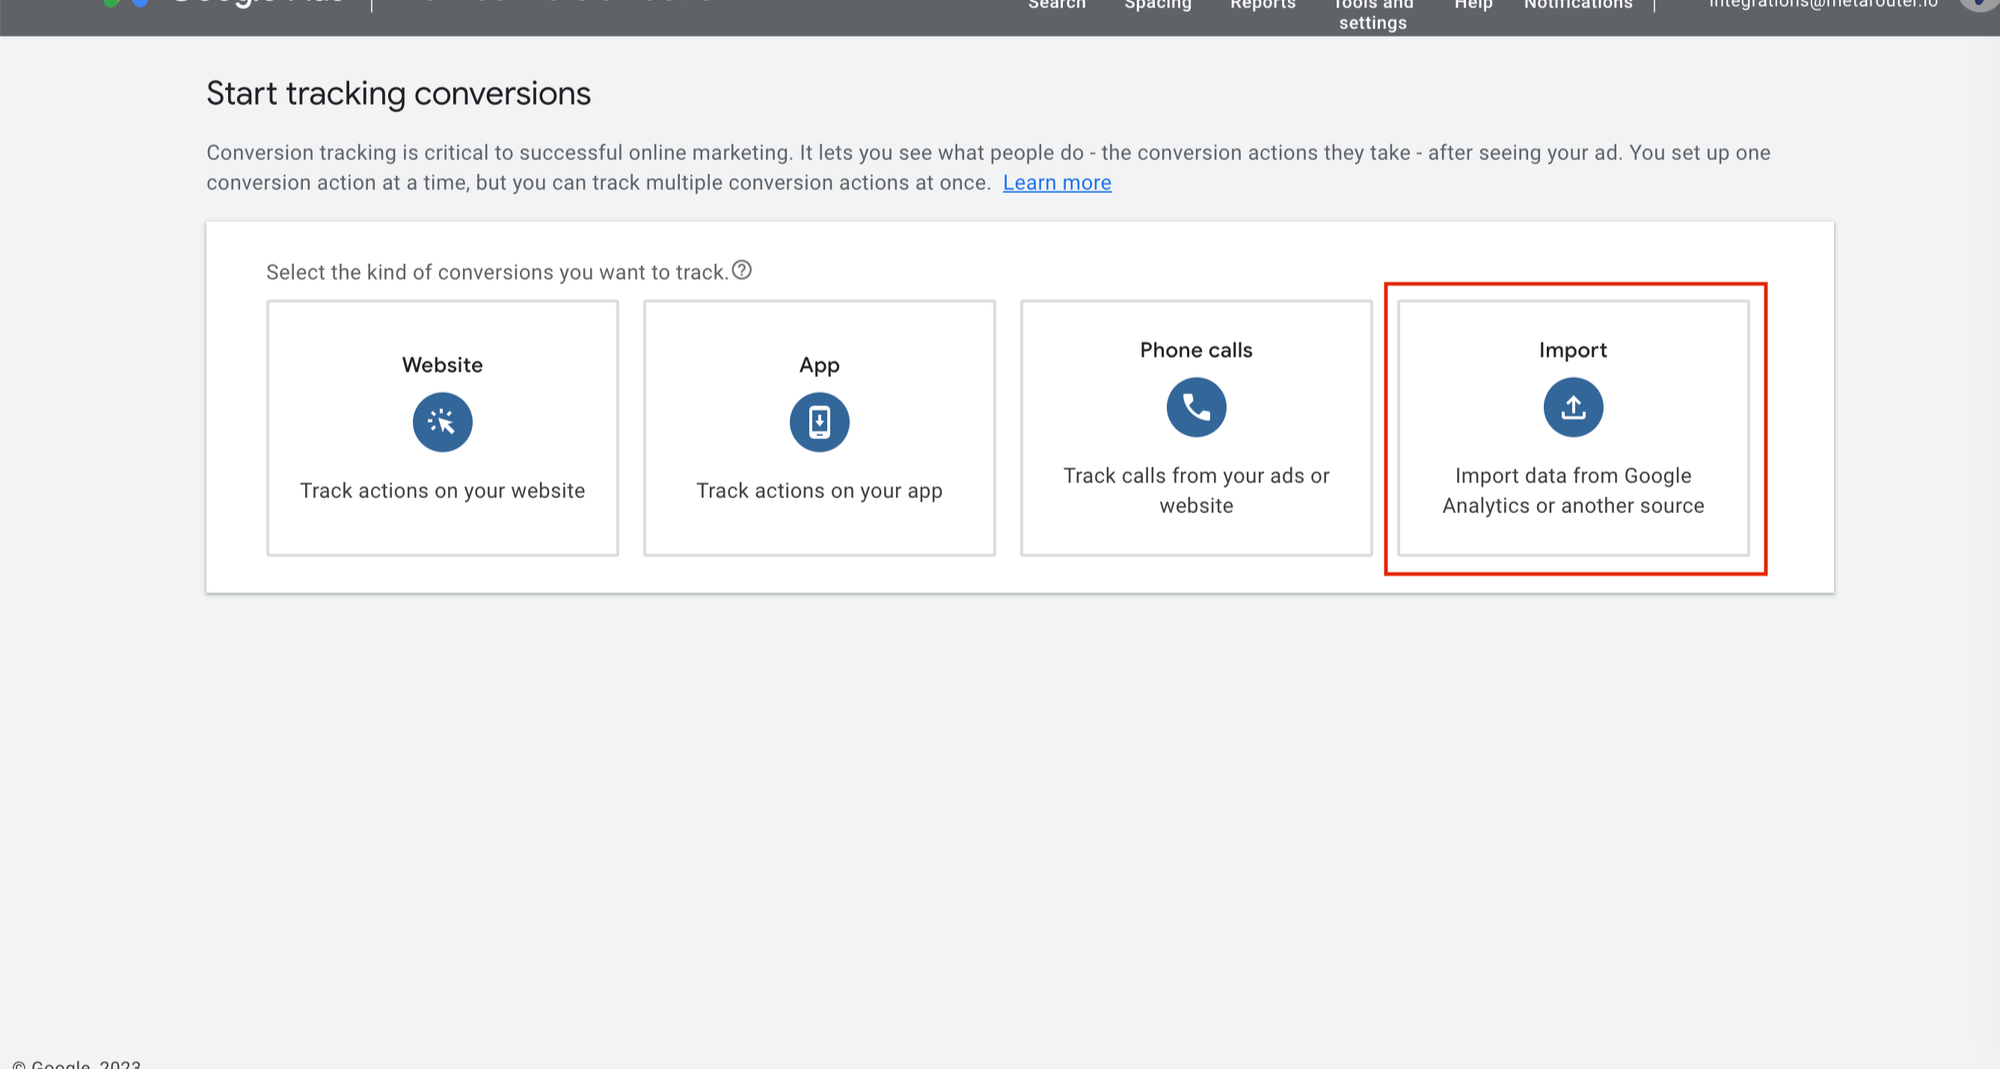
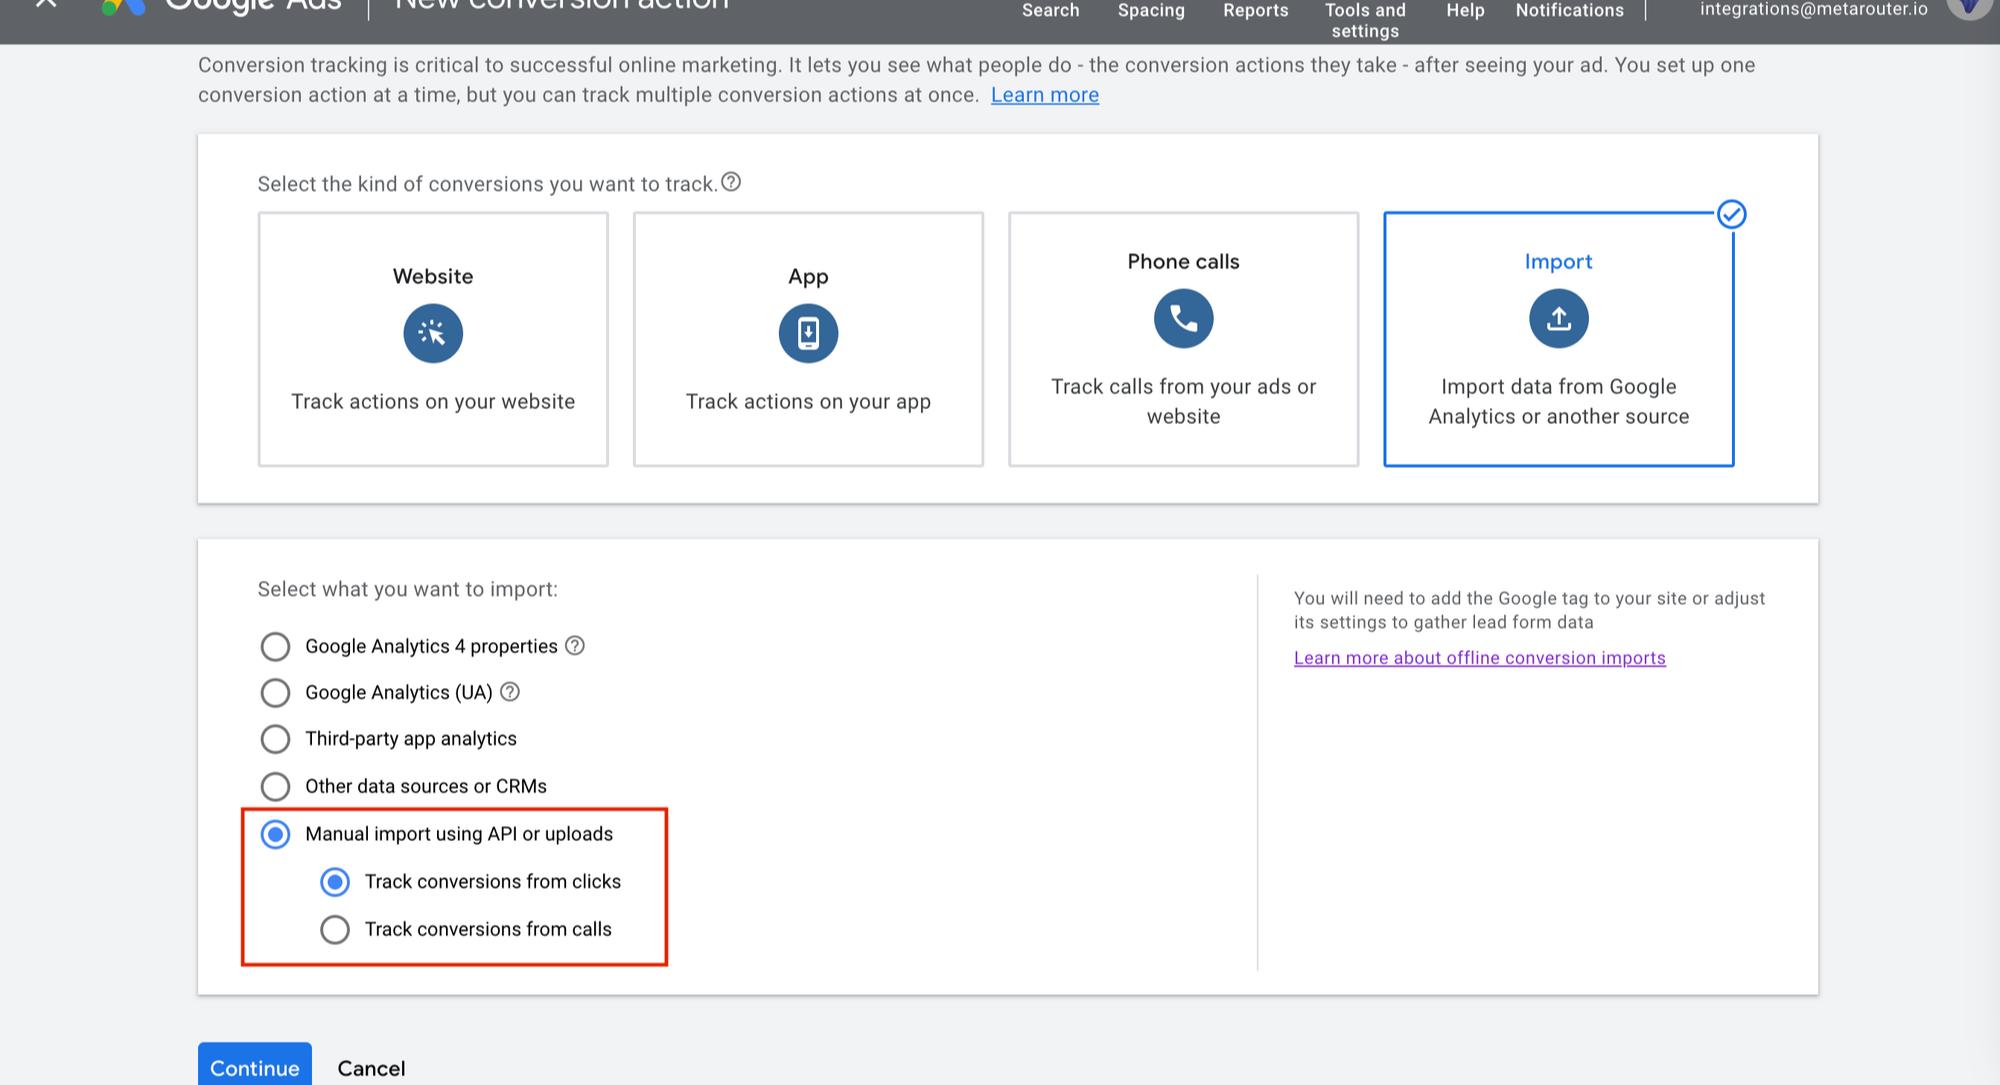
On the Conversions page, click on New conversion action button.
-
Select Import.
-
Select Manual import using API or uploads and be sure to select Track conversions from clicks.
-
Input settings for your conversion.
-
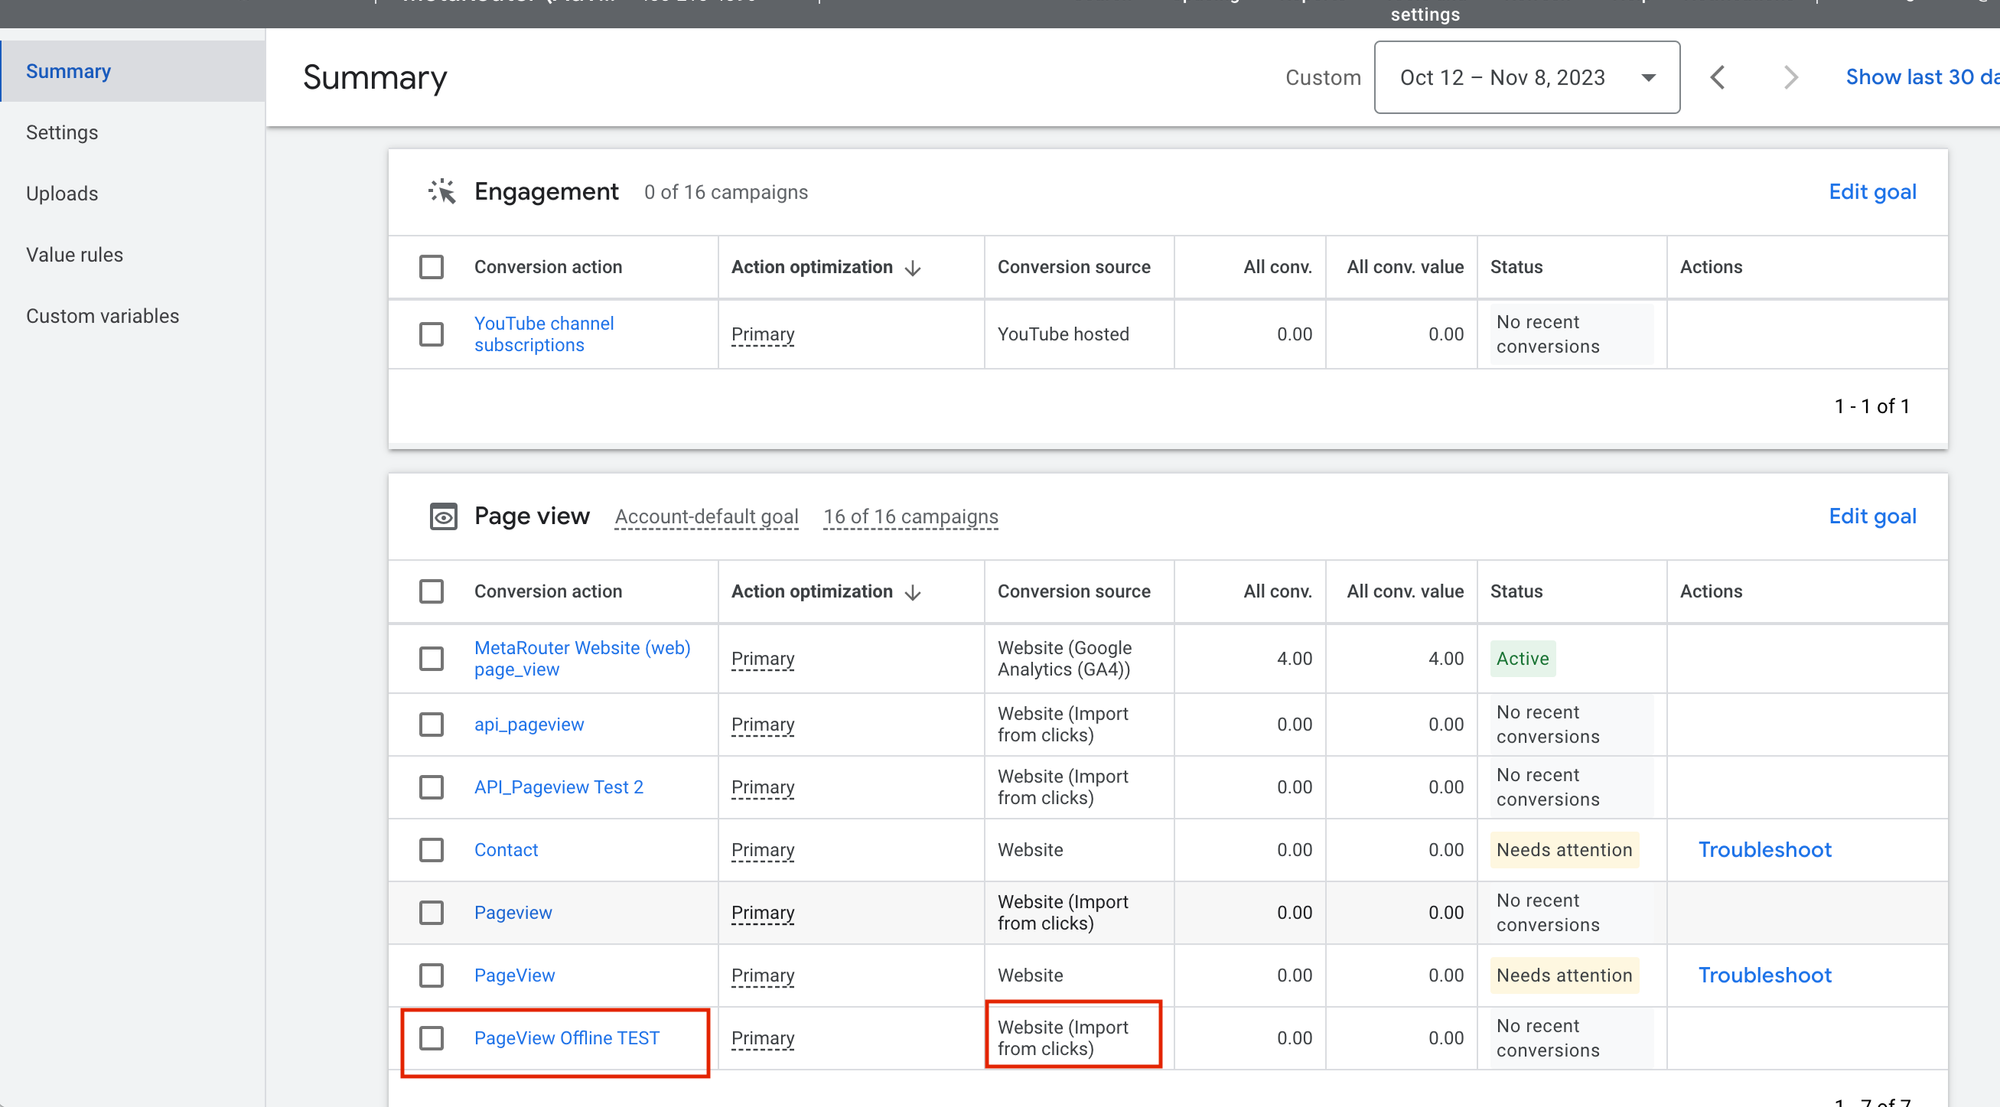
Your conversion should appear on your Summary list of conversions with the conversion source being “Website (import from clicks)”.
-
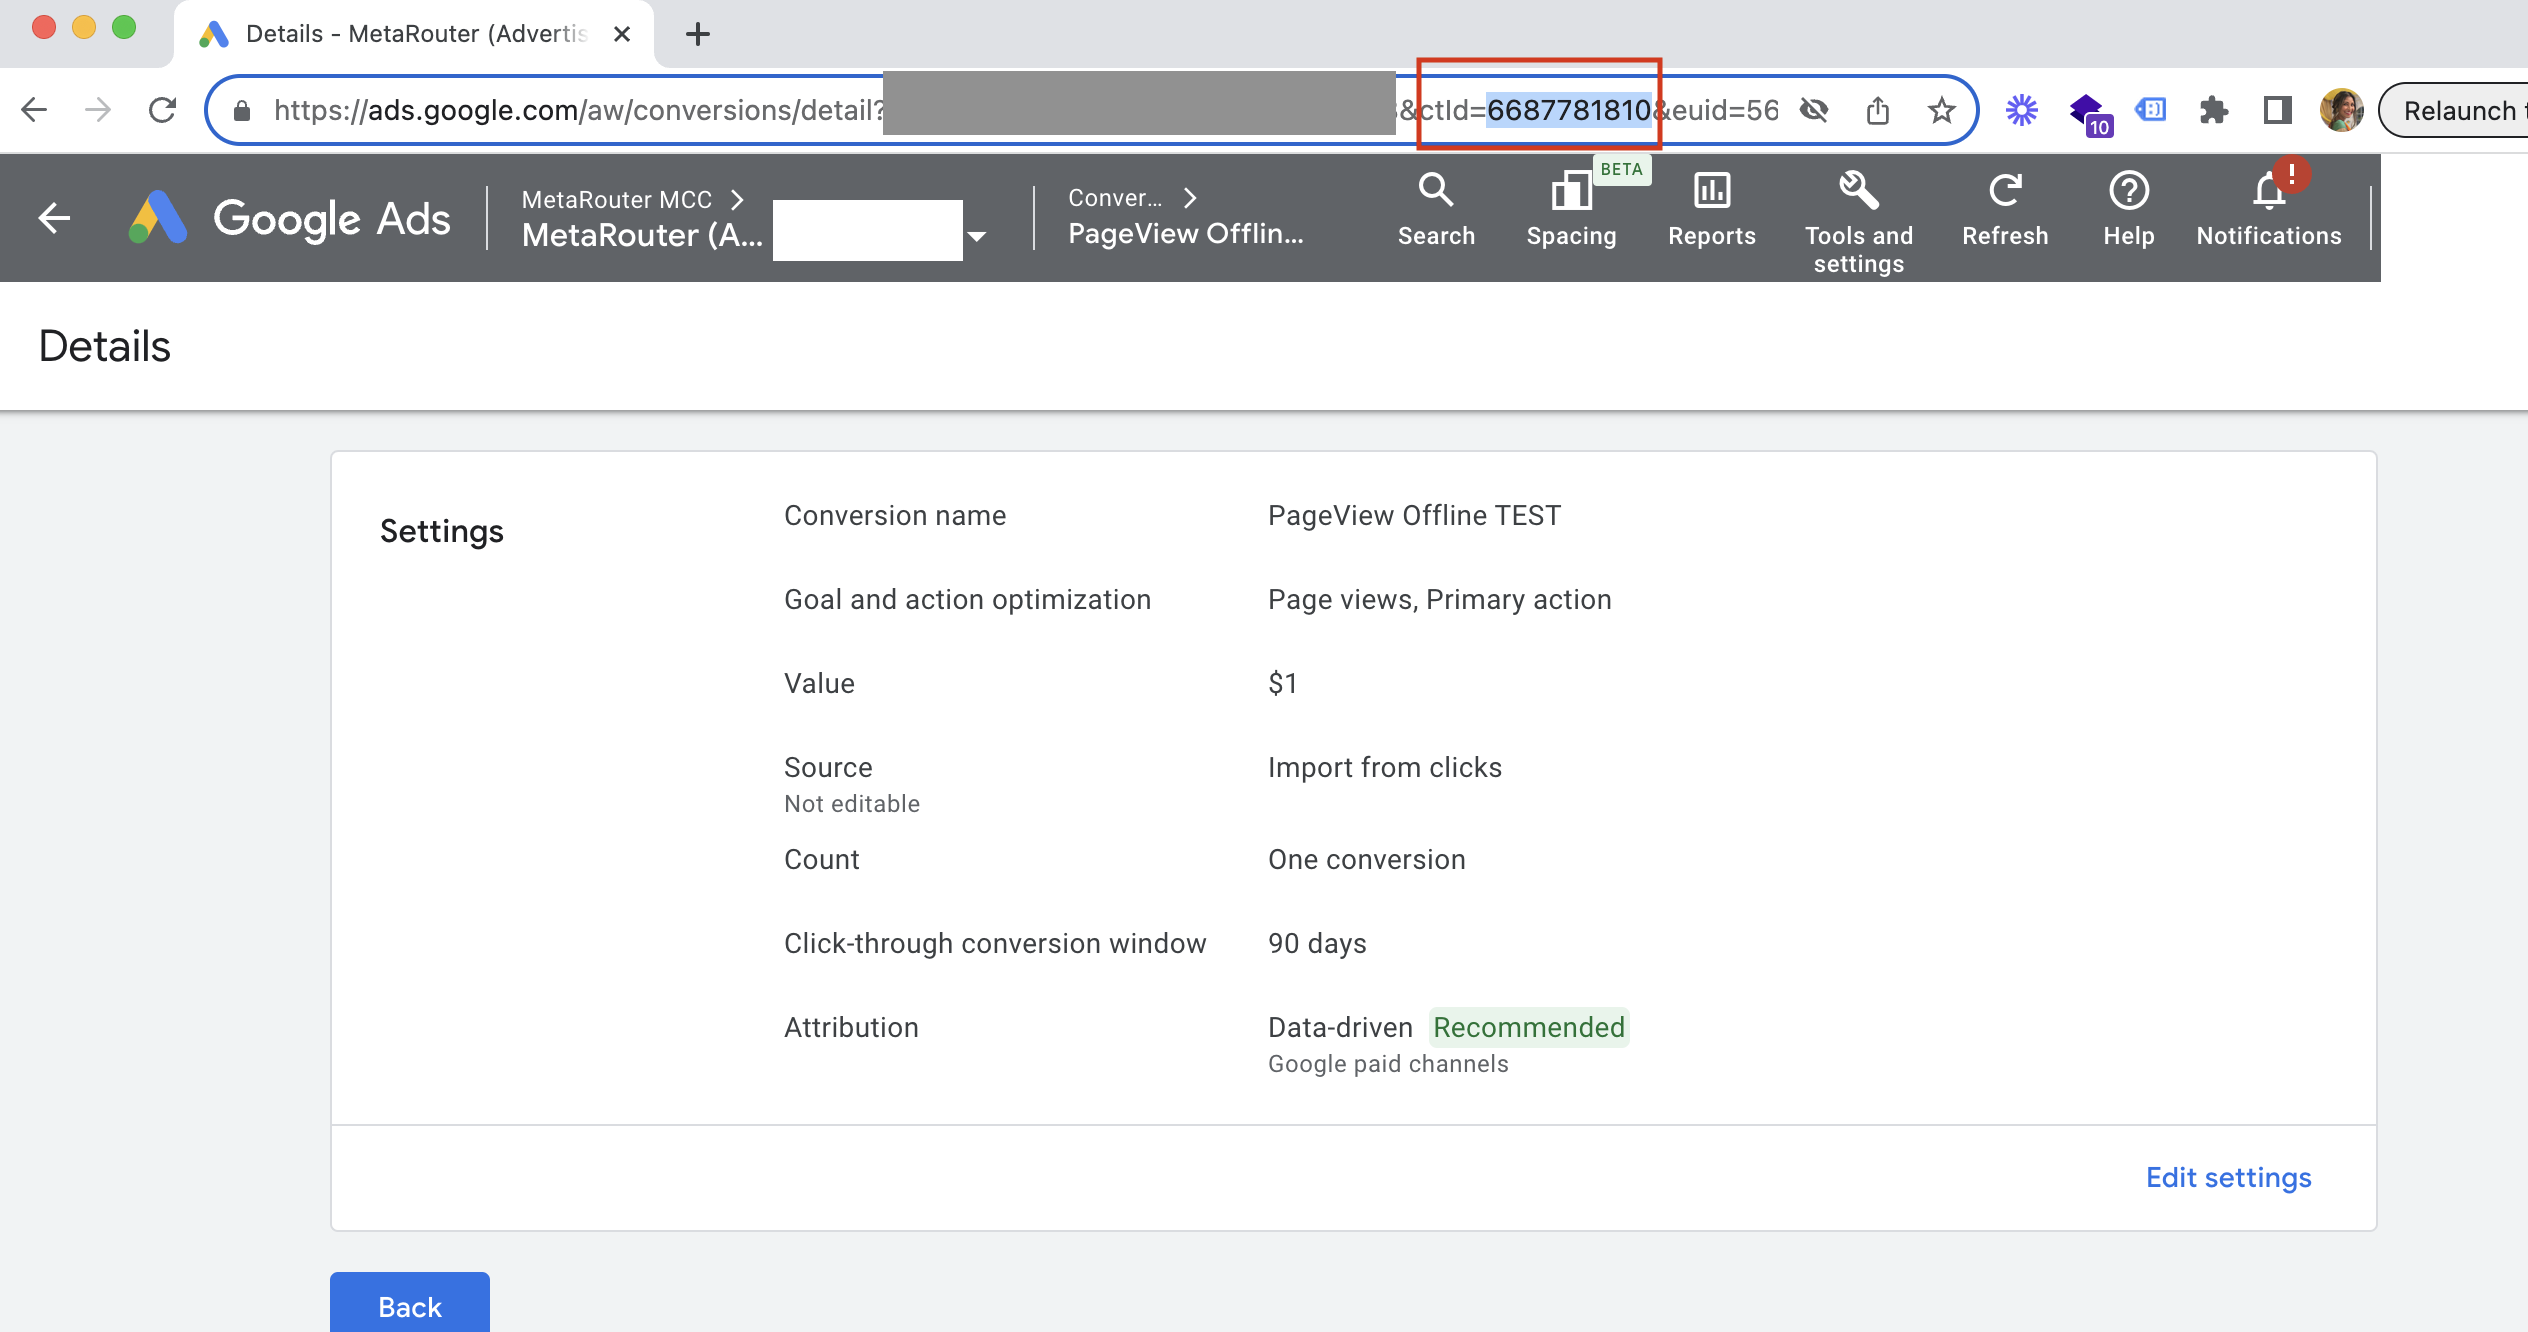
The conversion action ID can be found by clicking on the conversion, navigating to the URL, and using the numeric code following ctId=
-
Instructions on linking your offline conversion event IDs to your MetaRouter playbook are included here.
Getting Started - From Your MetaRouter Account
Adding a Google Ads - Conversions integration
From the integration library, add a Google Ads - Conversions integration. Then, fill out the Connection Parameters. Guides on how to find IDs, keys, and tokens and how to create account permissions can be found in Getting Started - From Google Ads section above.
| Connection Parameter | Description |
|---|---|
API_VERSION | This will be v16. |
CUSTOMER_ID | Identifies your Google Ads account. |
DEVELOPER_TOKEN | Developer token obtained from Google Ads, API Center. |
PRINCIPAL_EMAIL | The email you use to log in to Google Ads and the email that created the service account. |
SERVICE_ACCOUNT_EMAIL | Email created in Google Cloud Platform, Service Accounts. |
PRIVATE_KEY | Private key generated from Google Cloud Platform. |
Adding a Google Gtag Sync
To gather the gclid (Google click ID) value, you must add a Google Gtag sync.
- From the Pipelines page, find the pipeline associated with the web property you’d like to add a sync to. Hover over the three-dot dropdown and select “Build AJS File.”
- In the Identity Syncs section, select the Google Gtag sync.
- Fill out the following fields:
- GTAG.js Tag ID - The Tag ID in GA4, also known as the Measurement ID, can be found in Data Streams. Alternatively, you can find it in your GTAG settings. Examples of Tag IDs include GT-XXXXXXXXX, G-XXXXXXXXX, and AW-XXXXXXXXX. For more information on locating the GTAG.js Tag ID, please refer to this guide.
- Destination IDs - Allows the sync to connect and direct events to the correct Google product. For Google Ads, the destination ID is the same as the conversion tracking ID, for example, AW-98765.
- Floodlight Advertiser ID Object - The Floodlight Advertiser ID. This is not required for the Google Ads integration, but it is used for other Google integrations such as Campaign Manager.
- Cookie Lifetime (in days) - 45 days default
- Fire on Re-sync - Re-syncs for an updated identifier when an Identify call is made.
- Send MetaRouterSync to GA4 - Sends a MetaRouterSync event to GA4 when the sync is loaded on the page.
- Enable Google Consent Mode - If enabled, consent categories 'ad _storage, 'ad_user_data', 'ad _personalization', 'analytics_storage' will be sent to Google when user is opt-in or opt -out
- Advanced Consent Mode Type (when consent mode is enabled) - If consent mode is enabled, the consent mode will be set to advanced' when this is on, and 'basic' when this is off
- Scroll down and click the Save and Build File button.
- Deploy your AJS file to propagate changes to your web property.
Add Integration to Pipeline
Once you’ve adjusted the starter kit, please go to Pipelines > Select your Pipeline > Right drop-down > Add Integration > Select your Google Ads integration and revision > Deploy.
Event Mappings
MetaRouter provides all of the event mappings that Google Ads integrations typically require. You may add custom events, parameters, or mappings following Google Ads’ API documentation.
Global
Global mappings will be applied to all events.
| Output Key | Description |
|---|---|
gclidRequired | Type: String The Google click ID (gclid) associated with this conversion. |
conversionDateTimeRequired | Type: String The date time at which the conversion occurred. Must be after the click time. The timezone must be specified. The format is "yyyy-mm-dd hh:mm:ss+|-hh:mm", for example, "2019-01-01 12:32:45-08:00". Must send the timezone offset. We use the context.providers.googleGtag.data.timezone_offset value from the Gtag sync. |
Event Specific
The page and order_completed events listed below are included in the default playbook.
page
| Output Key | Description | Expected Input |
|---|---|---|
conversionActionRequired | Type: String The conversion action must have a type of UPLOAD_CLICKS, and must exist in the Google Ads conversion customer of the Google Ads account associated with the click. Assign your offline conversion action ID here. | N/A - Expression |
conversionValueRequired | Type: Double The value of the conversion. | N/A - Enrichment |
order_completed
| Output Key | Description | Expected Input |
|---|---|---|
conversionActionRequired | Type: String The conversion action must have a type of UPLOAD_CLICKS, and must exist in the Google Ads conversion customer of the Google Ads account associated with the click. Assign your offline conversion action ID here. | N/A - Expression |
conversionValueRequired | Type: Double The value of the conversion. | N/A - Enrichment |
currencyCodeRequired | Type: String The currency code of the conversion_value | properties.currency |
orderIdOptional | Type: String The order ID associated with the conversion. An order id can only be used for one conversion per conversion action. | properties.order_id |
cartData.itemsOptional | Type: CartData The cart data associated with this conversion. product_id quantityunit_price | N/A - Expression |
Mapping Conversion IDs to Events
You must map your offline conversion event ID to each event. Refer below for mapping instructions:
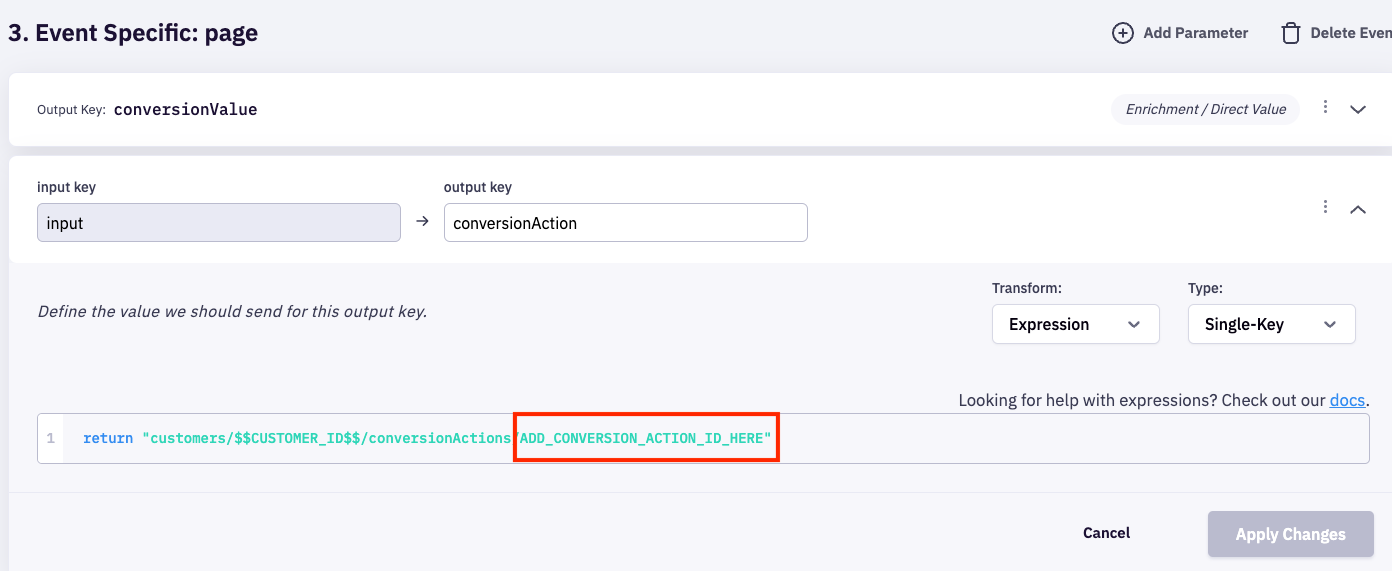
- Open Event in the playbook.
- Select an event such as “page”.
- Expand
conversionActionparameter. - In the
returnline, replaceADD_CONVERSION_ACTION_ID_HEREwith the corresponding offline conversion event ID. Steps to create offline conversion events in Google Ads and collecting the ID can be found here.
Required Identifiers
These identifiers must be mapped to Google Ads for successful user matching to occur. Without these IDs, any events sent to Google Ads will be rejected. For your convenience, required IDs are mapped as Global parameters to ensure they are added to every event.
| Attribute | Example | Sync Injector Required? |
|---|---|---|
gclidRequired | &gclid=CjwKCAjwt-OwBhBnEiwAgwzrUkyNMRwtorgWNStUyWMG50WbzKNMWAFeWOHtq5q0cEbAHYKX7a4hNBoCwugQAvD_BwE | Yes |
conversionDateTime Required | The format is "yyyy-mm-dd hh:mm:ss+|-hh:mm", for example, "2019-01-01 12:32:45-08:00". | No |
Google Ads - Google Analytics 4 Path
Google Analytics 4 (GA4) offers an alternative method for importing conversion data into Google Ads. This approach leverages GA4's capabilities to transmit conversion data directly from your server-side environment. Refer to the official Google Analytics 4 integration details for further information HERE.
Process:
- Link GA4 and Google Ads: Ensure your GA4 property and Google Ads account are linked to enable data sharing. See here for instructions.
- Identify Relevant GA4 Events: In GA4, pinpoint the specific events that signify valuable user actions closely aligned with your Google Ads conversion goals (e.g., "purchase_confirmation" event for purchases).
- Import Events into Google Ads: Within Google Ads, navigate to the "Conversions" section and choose "Import." Select "Google Analytics 4 properties" and then pick the relevant GA4 events you want to import. See here for more information and instructions.
- Configure Conversion Settings: Here's where careful attention is needed. You'll define how Google Ads interprets the imported event as a conversion. This might involve:
- Counting Method: Choose how to count conversions triggered by the event (e.g., every time, once per user).
- Conversion Window: Set the timeframe within which a conversion is considered valid after a user clicks on your ad (e.g., 30 days).
- Conversion Category: Categorize the conversion for better reporting (e.g., purchases, leads).
Considerations:
- Matching GA4 Events to Goals: Accurately mapping GA4 events to your desired Google Ads conversion goals is crucial. Mismatches can lead to skewed data and ineffective campaign optimization.
- Attribution Models: Understand how the chosen attribution model (data-driven in GA4 vs. different options in Google Ads) might impact how conversions are credited across various touchpoints.
Google Ads Documentation
Updated 10 months ago