Google AJSID Segments
This integration is currently in beta. Contact your MetaRouter support team to get started.
What Is Google AJSID Segments?
Google AJSID Segments is an add-on for the Google Ads - Conversions integration that enables the creation of first-party audience lists based on website events such as page views, order completions, blog visits, and more. This integration captures users visiting specified site pages for first-party audience segmentation purposes.
Based on an AUDIENCE_ID, this integration adds operations to the designated offline user data job by incorporating the ajs anonymous ID. When an event, such as an order completion, occurs, it also includes product details related to the transaction. This process is aligned with the Google Ads API, following the guidelines outlined in the official documentation.
What are the benefits of integrating MetaRouter with Google AJSID Segments?
- Automated Audience Segmentation: This integration automatically builds first-party audience lists in Google Ads based on user interactions with your website (e.g., page views, order completions), reducing the need for manual intervention and improving efficiency.
- Enhanced User Targeting: By utilizing the ajs anonymous ID and incorporating detailed event data such as product information for order completions, this integration allows for more accurate and personalized ad targeting, boosting campaign effectiveness.
- Efficient Data Handling: The integration seamlessly processes user data and event details, enabling quick creation of audience segments in Google Ads while ensuring compliance with Google Ads API standards. This streamlines workflows and ensures high-quality data for ad targeting.
Capabilities and Considerations
- First-Party Audience Creation: Automatically creates first-party audience lists in Google Ads based on user activity on specific web pages (e.g., page views, blog visits, order completions).
- User Identifier Integration: Leverages the ajs anonymous ID for tracking and associating user activity with Google Ads audience segments.
- Event-Based Segmentation: Captures and processes a wide range of website events (e.g., order completions) to build detailed audience segments based on user actions.
- Automated Offline User Data Job Operations: Adds user data and event information (such as AUDIENCE_ID and product details for completed orders) to offline user data jobs in Google Ads.
- Consent Management: Incorporates user consent for advertising data and personalization, ensuring compliance with consent policies.
- Product-Level Event Data Capture: For order completion events, captures and sends specific product details, such as product ID, quantity, and transaction information, to Google Ads.
Limitations
- Single Audience Association: Each starter kit can only be tied to a single audience list ID, which means multiple audience segments require separate configurations.
- Event-Driven Limitations: Only specific website events (e.g., page views, order completions) are supported for audience creation, potentially limiting the range of segmentation based on more complex user behaviors.
- Dependency on ajs anonymous ID: The integration relies on the ajs anonymous ID for user identification, which may not support all types of user tracking or identification across platforms.
Getting Started - From Your Google Ads Account
-
Create a Customer List and Capture the Audience ID
- In your Google Ads account, select Tools.
- Select Audience Manager and click on the “+” sign to add a new Customer List.
- Select “Skip this step and set up a data source later”.
- Name your segment and click Done.
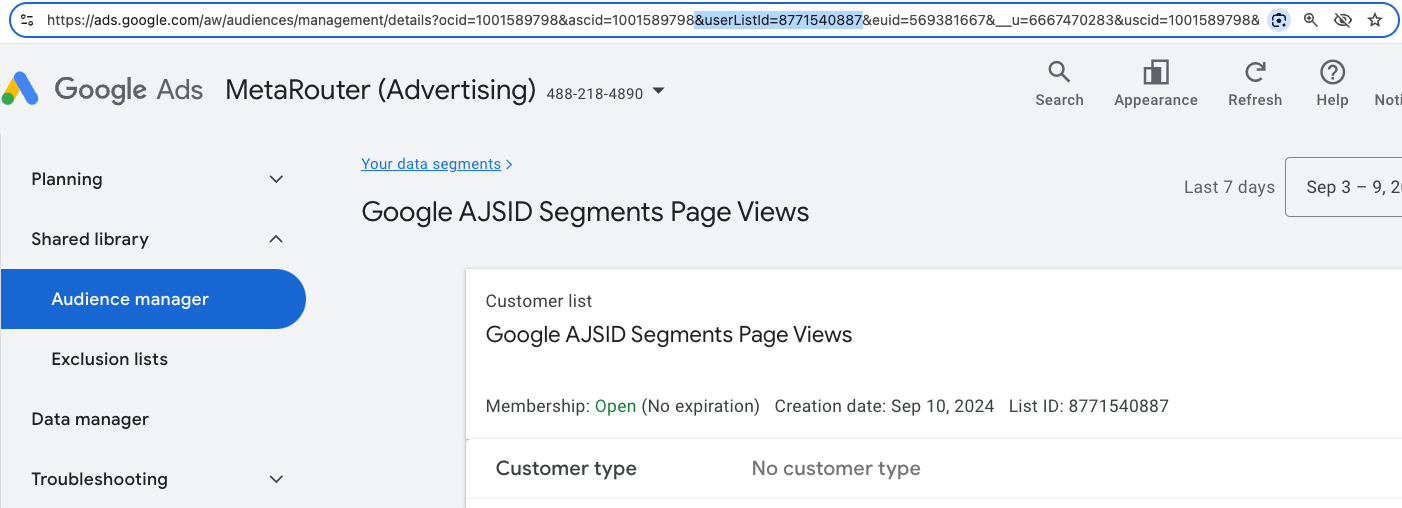
- You can grab the Audience ID needed in the integration in the URL of your data segment page, copy the numeric code following &userListId=
-
Find and capture your AW GTAG ID
- In your Google Ads account, select Tools.
- Select Audience Manager and click on the Your data sources tab.
- Click on Details in your Google Ads tag widget.
- Click on Tag Setup and then Install the tag yourself.
- Within the tag’s code, you will find
gtag('config', 'AW-00000000000');, copy the numeric value following “AW-”.
-
Developer Token
- Create a Developer Token
- In your Google Ads account, select Admin.
- Under Setup, select API Center, which will create the required developer token.
- After the test API has been created, click the access level.
- Apply for Basic Access.
- This step can take up to three days.
- Save the token to use within the connection parameters as the
DEVELOPER_TOKEN.
- Create a Developer Token
-
Create OAuth Flow
-
Create service account
-
Go to Google Cloud console.
-
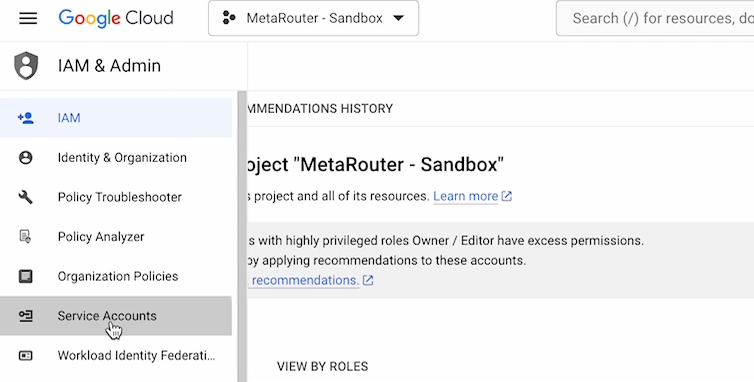
Click on Service Accounts.
-
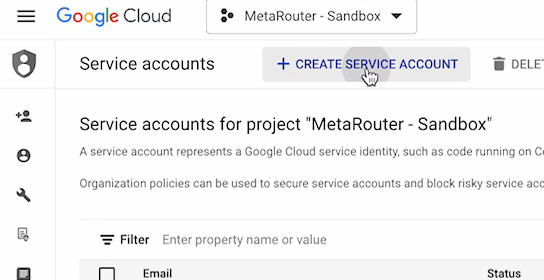
Click Create Service Account.
-
Fill out service account details.
-
Press the Create and continue button.
-
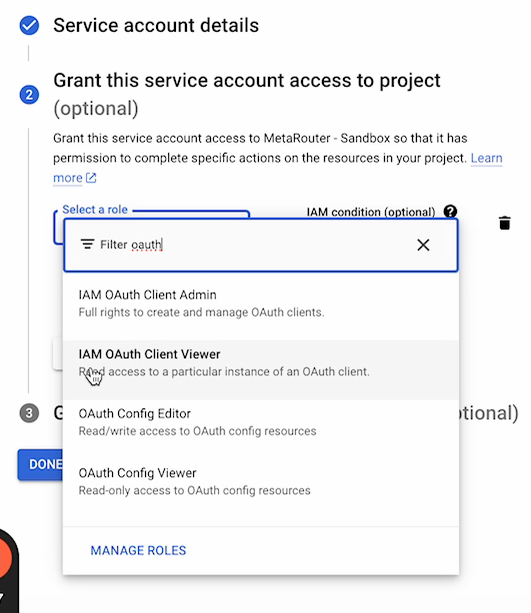
Select role for service account. We recommend minimal access with a role such as “IAM OAuth Client Viewer”. You may skip user access portion.
-
Hit done to create service account.
-
Under the “Email” column, you will use the email listed within the connection parameters as the
SERVICE_ACCOUNT_EMAIL.
-
-
Create a Private Key
-
Continuing within the Google Cloud console, Service Accounts window, look for the service account you created and click on the 3-dot menu under the “Actions” column.
-
Click Manage Keys.
-
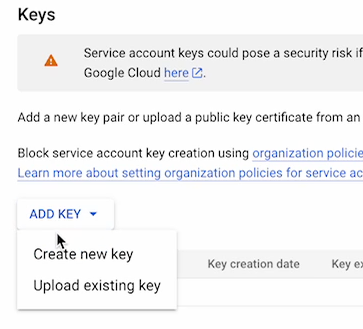
Click Add Key.
-
Click Create New Key.
-
Select “JSON” as the key type and click Create. A file will save to your device.
-
Use the save key in the connection parameters as the
PRIVATE_KEY.
-
-
Perform Google Workspace domain-wide delegations of authority
-
Go to Admin Console.
-
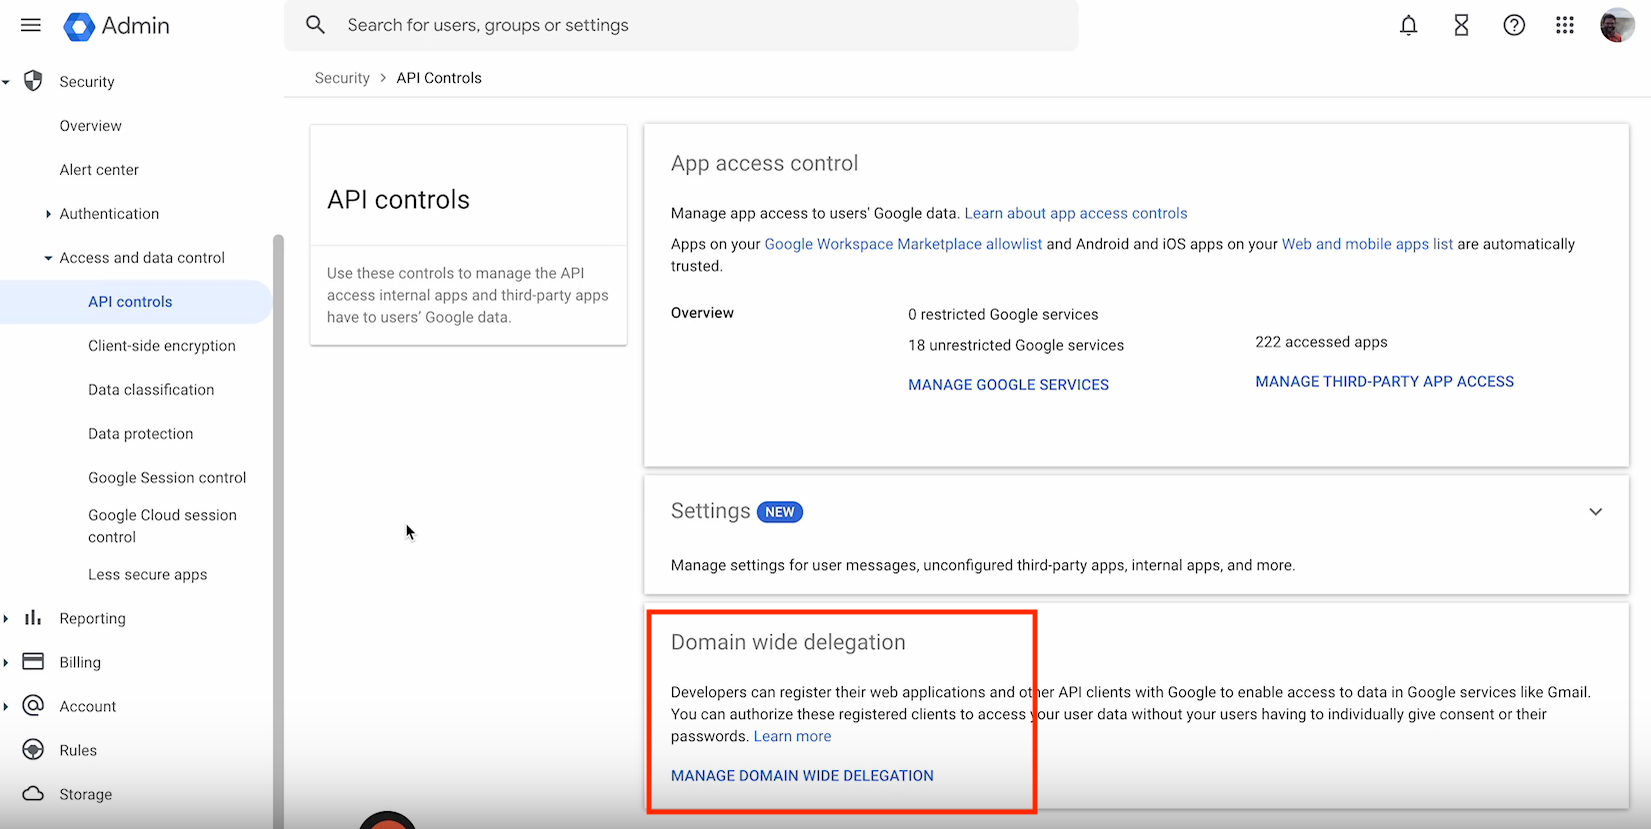
Go to Security > API Controls > Domain-wide Delegation > Manage Domain Wide Delegation.
-
Click Add new.
-
In the Client ID field, enter the client ID obtained from the service account creation steps above.
- Click on your service account email in Google Cloud console
- Click on Advanced settings and you will find your Client ID
-
In the ”OAuth Scopes” field, enter a comma-delimited list of the scopes required for your application.
-
Add the following for Google Ads:
https://www.googleapis.com/auth/adwords
-
-
Click Authorize.
-
-
Getting Started - From Your MetaRouter Account
Adding a Google AJSID Segments integration.
From the integration library, add a Google AJSID Segments integration. Then, fill out the Connection Parameters:
| Connection Parameter | Description |
|---|---|
AUDIENCE_ID | The user list Id of your customer list audience segment. |
CUSTOMER_ID | Identifies your Google Ads account. |
DEVELOPER_TOKEN | Developer token obtained from Google Ads, API Center. |
PRINCIPAL_EMAIL | The email you use to log in to Google Ads and the email that created the service account. |
PRIVATE_KEY | Private key generated from Google Cloud Platform. |
SERVICE_ACCOUNT_EMAIL | Email created in Google Cloud Platform, Service Accounts. |
Adding a Google Ads Segments Sync
You need to add the Google Ads Segments sync to send the AJS ID to your Google Ads GTAG, allowing you to store users in your audience segment list.
-
From the Pipelines page, find the pipeline associated with the web property you’d like to add a sync to. Hover over the three dot dropdown and select “Build AJS File.”
-
In the Identity Syncs section, select the Google Ads Segments sync.
-
Fill out the following fields:
- Consent Type
- Cookie Lifetime (in days)
- Conversions - Please paste the following template:
[{"adsID":"AW-XXXXXXXXXXX","label":"LABEL"}]- Replace XXXXXXXXXXX with your AW GTAG numeric value as mentioned in the steps above.
- Please use an arbitrary label such as “LABEL”. If you change the label to “CONVERSIONS” then you may see duplicate conversions in Google Ads.
-
Scroll down and click the Save and Build File button.
-
Deploy your AJS file to propagate changes to your web property.
Event Mappings
You can tailor the playbook based on the users you wish to include in your audience segment. The starter kit provides the "Order Completed" event as a reference point.
Event Specific
Order Completed
| Output Key | Description | Expected Input |
|---|---|---|
order_completed | Type: Object The code processes an order_completed event by extracting product details, transaction info, and locale settings. It formats the data, including transaction date, amount, currency, order ID, product ID, quantity, language, and country, into a structured JSON object. | N/A - Expression |
Required Identifiers
These identifiers must be mapped to Google AJSID Segments in order for successful user matching to occur.
| Attribute | Example | Sync Injector Required? |
|---|---|---|
| ajsid | 130161d0-8fee-4167-aa4d-d151eed27c6b | Yes* |
*The sync injector is needed to send the AJS ID to the Google Ads GTAG.
Additional Google AJSID Segments Documentation
Updated 9 months ago